SendgridのEvent WebhookログをAWSに連携する

sendgridを利用しており送信履歴をログに残したい要件がありました。
対応する機能としてSendgridではWebhook機能があり、
メールを送信や開封等のイベントを
指定のエンドポイントに送信できます。
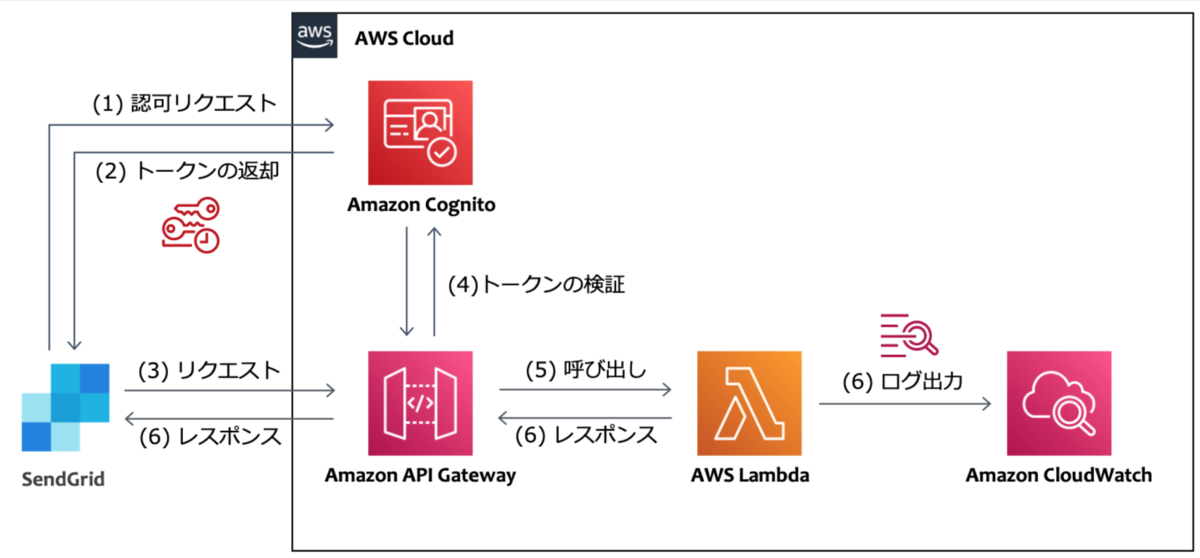
サンプルの構成
実際の構成はどのようになるかと言うと、
公式のブログにサンプル構成があり、
こちらがとても参考になりました。
ただ、何点か構成を変更したい点がありました。
構築したい構成
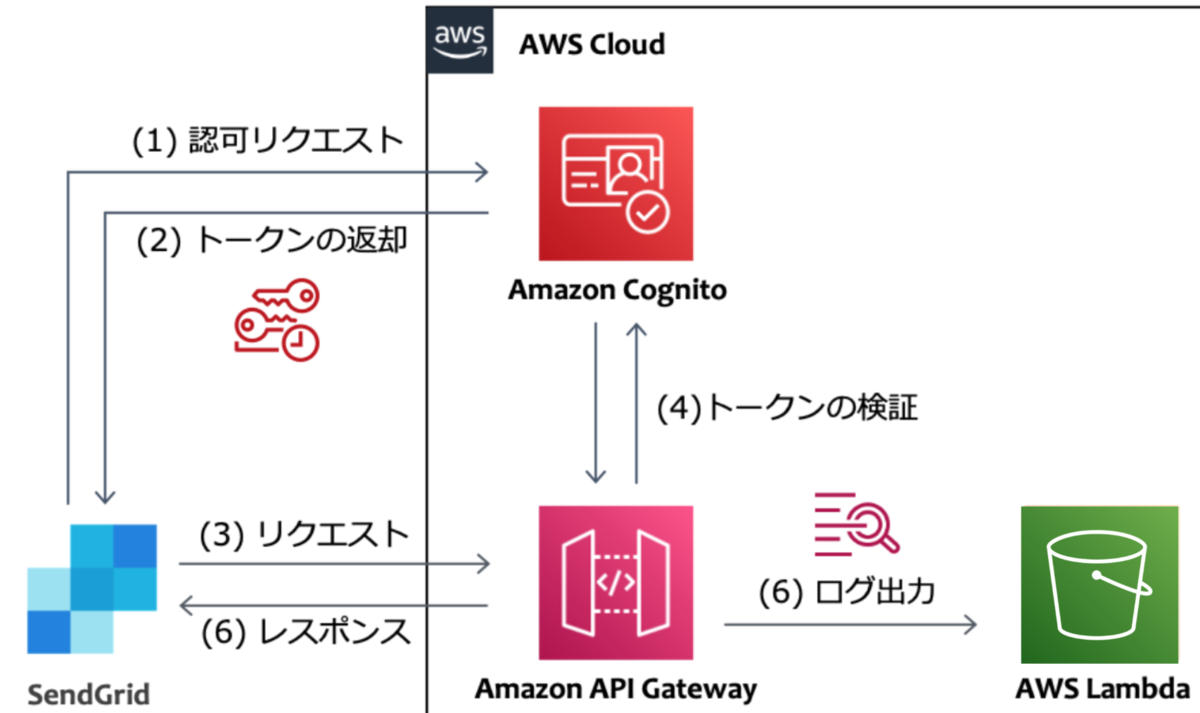 上記サンプルとの違いは下記です
ログはS3に格納する
数量が膨大になりそうでしたので、より料金単価が安いS3にしました。
Lambdaを利用しない(apigatewayとs3を直接連携)
背景として、今回のケースではメールのイベントログを格納したいだけであり、
何か加工等の特別な処理をさせたい訳でなかったため、
Lambdaを利用する必要がありませんでした。
Lambda経由でS3に格納しても要件実現はできてしまうのですが、
特に、Lambdaのスケーラビリティを心配したくないことや、
ソース管理の必要があるといったデメリットを抱えてしまうため
利用しない形としました。
CDKで書きたい
サンプルで書いてみました。
apigateway周りでもう少し細かい設定を付与したいですが、
最低限のものとお考えください。
import {
  Stack,
  StackProps,
  RemovalPolicy,
  aws_apigateway as apigateway,
  aws_s3 as s3,
  aws_iam as iam,
  aws_certificatemanager as acm,
  aws_route53 as route53,
  aws_cognito as cognito,
  aws_route53_targets as targets,
} from 'aws-cdk-lib';
import { Construct } from 'constructs';

const scopeName = 'activity';

type Props = {
  hostedZoneId: string;
  domainName: string;
  domainPrefix: string;
  bucketName: string;
} & StackProps;

export class SendgridWebhookS3Stack extends Stack {
  constructor(scope: Construct, id: string, props: Props) {
    super(scope, id, props);

    const { hostedZoneId, domainName, domainPrefix, bucketName } = props;

    const bucket = new s3.Bucket(this, 'Bucket', {
      bucketName: bucketName,
      removalPolicy: RemovalPolicy.DESTROY,
    });

    const fullAccessScope = new cognito.ResourceServerScope({ scopeName: '*', scopeDescription: 'Full access' });
    const pool = new cognito.UserPool(this, 'Pool', {
      removalPolicy: RemovalPolicy.DESTROY,
    });
    const resourceServer = pool.addResourceServer('ResourceServer', {
      identifier: scopeName,
      scopes: [fullAccessScope],
    });

    pool.addDomain('CognitoDomain', {
      cognitoDomain: {
        domainPrefix: domainPrefix,
      },
    });

    pool.addClient('appClient', {
      generateSecret: true,
      oAuth: {
        flows: {
          clientCredentials: true,
        },
        scopes: [cognito.OAuthScope.resourceServer(resourceServer, fullAccessScope)],
      },
    });

    const auth = new apigateway.CognitoUserPoolsAuthorizer(this, 'Authorizer', {
      cognitoUserPools: [pool],
    });

    const restApiRole = new iam.Role(this, 'Role', {
      assumedBy: new iam.ServicePrincipal('apigateway.amazonaws.com'),
      path: '/',
    });
    bucket.grantReadWrite(restApiRole);

    const hostedZone = route53.HostedZone.fromHostedZoneAttributes(this, 'HostedZone', {
      hostedZoneId: hostedZoneId,
      zoneName: domainName,
    });

    const certificate = new acm.Certificate(this, 'Certificate', {
      domainName: `*.${domainName}`,
      validation: acm.CertificateValidation.fromDns(hostedZone),
    });

    const api = new apigateway.RestApi(this, 'RestAPI', {
      domainName: {
        domainName: `${domainPrefix}.${domainName}`,
        certificate: certificate,
      },
      // disableExecuteApiEndpoint: true,
      defaultCorsPreflightOptions: {
        allowOrigins: apigateway.Cors.ALL_ORIGINS,
        allowMethods: ['POST', 'OPTIONS'],
        statusCode: 200,
      },
      endpointConfiguration: {
        types: [apigateway.EndpointType.REGIONAL],
      },
    });
    const items = api.root.addResource('logs');
    const prefix = items.addResource('{prefix}');

    // オブジェクトをアップロードするための PUT メソッドを作成する
    prefix.addMethod(
      'POST',
      new apigateway.AwsIntegration({
        service: 's3',
        integrationHttpMethod: 'PUT',
        // アップロード先を指定する
        path: `${bucket.bucketName}/{prefix}/{fileName}`,
        options: {
          credentialsRole: restApiRole,
          passthroughBehavior: apigateway.PassthroughBehavior.WHEN_NO_MATCH,
          requestParameters: {
            // メソッドリクエストのパスパラメータを統合リクエストのパスパラメータにマッピングする
            'integration.request.path.prefix': 'method.request.path.prefix',
            'integration.request.path.fileName': 'context.requestId',
          },
          integrationResponses: [
            {
              statusCode: '200',
              responseParameters: {
                'method.response.header.Timestamp': 'integration.response.header.Date',
                'method.response.header.Content-Length': 'integration.response.header.Content-Length',
                'method.response.header.Content-Type': 'integration.response.header.Content-Type',
                'method.response.header.Access-Control-Allow-Headers': "'Content-Type,Authorization'",
                'method.response.header.Access-Control-Allow-Methods': "'OPTIONS,POST,PUT'",
                'method.response.header.Access-Control-Allow-Origin': "'*'",
              },
            },
            {
              statusCode: '400',
              selectionPattern: '4\\d{2}',
              responseParameters: {
                'method.response.header.Access-Control-Allow-Headers': "'Content-Type,Authorization'",
                'method.response.header.Access-Control-Allow-Methods': "'OPTIONS,POST,PUT'",
                'method.response.header.Access-Control-Allow-Origin': "'*'",
              },
            },
            {
              statusCode: '500',
              selectionPattern: '5\\d{2}',
              responseParameters: {
                'method.response.header.Access-Control-Allow-Headers': "'Content-Type,Authorization'",
                'method.response.header.Access-Control-Allow-Methods': "'OPTIONS,POST,PUT'",
                'method.response.header.Access-Control-Allow-Origin': "'*'",
              },
            },
          ],
        },
      }),
      {
        authorizer: auth,
        authorizationScopes: [`${scopeName}/*`],
        requestParameters: {
          'method.request.path.prefix': true,
          'method.request.path.fileName': true,
        },
        methodResponses: [
          {
            statusCode: '200',
            responseParameters: {
              'method.response.header.Timestamp': true,
              'method.response.header.Content-Length': true,
              'method.response.header.Content-Type': true,
              'method.response.header.Access-Control-Allow-Headers': true,
              'method.response.header.Access-Control-Allow-Methods': true,
              'method.response.header.Access-Control-Allow-Origin': true,
            },
          },
          {
            statusCode: '400',
            responseParameters: {
              'method.response.header.Access-Control-Allow-Headers': true,
              'method.response.header.Access-Control-Allow-Methods': true,
              'method.response.header.Access-Control-Allow-Origin': true,
            },
          },
          {
            statusCode: '500',
            responseParameters: {
              'method.response.header.Access-Control-Allow-Headers': true,
              'method.response.header.Access-Control-Allow-Methods': true,
              'method.response.header.Access-Control-Allow-Origin': true,
            },
          },
        ],
      }
    );
    new route53.ARecord(this, 'ARecod', {
      zone: hostedZone,
      recordName: `${domainPrefix}.${hostedZone.zoneName}`,
      target: route53.RecordTarget.fromAlias(new targets.ApiGateway(api)),
    });
  }
}
結果確認
作成されたcognitoからclientIdとsecretを取得し、
下記の要領でリクエスト実行します。
<>で囲んだ部分はcdkで指定した値に読み替えてください。
DOMAIN=https://<domainPrefix>.auth.ap-northeast-1.amazoncognito.com
APP_CLIENT_ID=xxxxxx
APP_CLIENT_SECRET=xxxxx
curl -s -X POST ${DOMAIN}/oauth2/token \
-H "Authorization: Basic $(echo -n ${APP_CLIENT_ID}:${APP_CLIENT_SECRET} | base64 )" \
-H "Content-Type: application/x-www-form-urlencoded" \
-d "grant_type=client_credentials" \
-d "client_id=${APP_CLIENT_ID}"


curl -X POST 'https://<domainPrefix>.<domainName>/logs/<prefix>/' \
--header "Authorization: Bearer xxxxxxxxxxx" \
--data '{"message":"Hello"}'
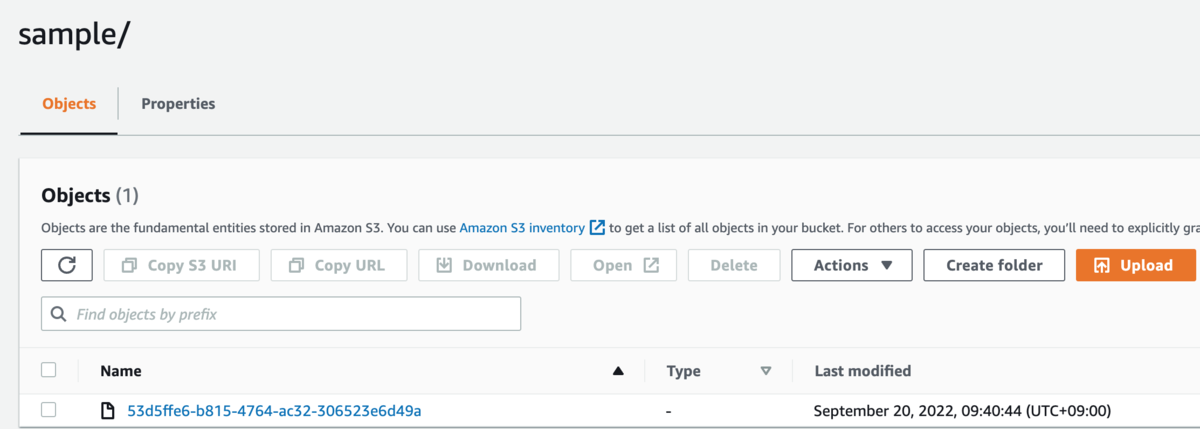
S3にログが格納されていることを確認できました。
S3内ではprefixで指定した文字列の配下にログが格納されます。
下記はprefixにsampleを指定した場合の例です。
おまけで、SendgridではSubuserという機能があり、
論理単位でログの出力を複数設定することができます。
そのため、特定用途のメールのみprefixを分けて
ログ出力するといったことも可能で下。
sendgrid.kke.co.jp